
Plan the five bench tiers, compare material costs and identify recipes made at the separate workshop or meteor anvil.
Start with the camp Crafting Bench: feed it Wood and Scrap, then select a recipe your current tier offers. A Map and the first bench upgrade are useful early goals; keep enough fuel for the campfire and postpone expensive structures until the camp can support them. Tool Workshop and Meteor Anvil are separate stations with different materials.
Crafting costs and event recipes can change. Use the price and availability displayed at your station before spending materials.
Upgrade the camp bench
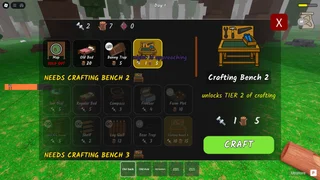
IGN screenshot of an older interface; recipe costs may differ in the current version. IGN
Each row is the cost of that upgrade, not the cost of all preceding tiers. Cultist Gems and Gem of the Forest are different materials.
| Upgrade | Bench needed | Reported cost | Running total from Tier 1 |
|---|---|---|---|
| Tier 2 | Tier 1 | 5 Wood + 1 Scrap | 5 Wood + 1 Scrap |
| Tier 3 | Tier 2 | 15 Wood + 10 Scrap | 20 Wood + 11 Scrap |
| Tier 4 | Tier 3 | 30 Wood + 20 Scrap + 2 Cultist Gems | 50 Wood + 31 Scrap + 2 Cultist Gems |
| Tier 5 | Tier 4 | 50 Wood + 50 Scrap + 1 Gem of the Forest | 100 Wood + 81 Scrap + 2 Cultist Gems + 1 Gem of the Forest |
The running total covers upgrades only, not buildings, consumables or campfire fuel. Other sources give different upgrade figures, so check the actual button before planning around the total. Put scrap-bearing junk and wood into the grinder and read the displayed totals; reserve enough for the next upgrade and the items you actually need.
Camp bench recipes by tier
The costs below follow the newer catalogue and cost table. They are reported costs, not a promise of current in-game prices. Tier denotes the bench tier required to craft the item; the upgrade rows are in the previous table.
| Tier | Item | Reported materials | Main use or check |
|---|---|---|---|
| 1 | Map | 3 Wood | Navigation and locating areas. |
| 1 | Supply Crate | 3 Wood | Camp customization; check whether it is useful for your run. |
| 1 | Old Bed | 20 Wood | Increases the day counter. |
| 1 | Bunny Trap | 5 Wood | Place near a bunny burrow for food. |
| 2 | Sun Dial | 5 Scrap | Shows time remaining; another source reports 5 Wood. |
| 2 | Regular Bed | 5 Scrap | Increases the day counter. |
| 2 | Compass | 3 Scrap | Helps with direction and navigation. |
| 2 | Farm Plot | 20 Wood | Food production; an older table reports 10 Wood. |
| 2 | Wood Rain Storage | 5 Scrap | Store wood away from rain. |
| 2 | Shelf | 2 Scrap | Store items. |
| 2 | Log Wall | 20 Wood | Base barrier; an older table reports 12 Wood. |
| 2 | Log Gate | 20 Wood | Opening in a wall. |
| 2 | Bear Trap | 3 Scrap | Trap for defense; check placement around teammates. |
| 3 | Crock Pot | 15 Wood + 10 Scrap | Prepare food. |
| 3 | Radar | 15 Wood + 10 Scrap | Finds locations; operation may consume additional Scrap. |
| 3 | Boost Pad | 15 Wood + 10 Scrap | Movement support; a separate recipe unlock may be needed. |
| 3 | Biofuel Processor | 12 Wood + 12 Scrap | Converts suitable materials into fuel. |
| 3 | Torch | 6 Wood + 6 Scrap | Extra light. |
| 3 | Good Bed | 10 Wood + 10 Scrap | Increases the day counter. |
| 3 | Lightning Rod | 8 Scrap | Helps manage lightning near camp. |
| 3 | Flag | 6 Wood + 2 Scrap | Camp marker. |
| 4 | Ammo Crate | 20 Wood + 30 Scrap + 1 Cultist Gem | Supports ammunition purchases. |
| 4 | Oil Drill | 25 Wood + 35 Scrap + 1 Cultist Gem | Produces oil over time. |
| 4 | Giant Bed | 20 Wood + 30 Scrap + 1 Cultist Gem | Increases the day counter. |
| 4 | Teleporter | 15 Wood + 25 Scrap + 1 Cultist Gem | Travel between placed teleporters; plan for at least two. |
| 5 | Respawn Capsule | 40 Wood + 40 Scrap + 1 Gem of the Forest | Respawn support after charging; check the device before relying on it. |
| 5 | Temporal Accelerometer | 40 Wood + 40 Scrap + 1 Gem of the Forest | Reported to skip a night after charging. |
| 5 | Weather Machine | 40 Wood + 40 Scrap + 1 Gem of the Forest | Reported to stop rain and storms temporarily after charging. |
| 5 | Recycler | 40 Wood + 40 Scrap + 1 Gem of the Forest | Converts specified gems into other resources. |
Sources also disagree about Freezer: an older list includes it for 4 Scrap, while the newer catalogue marks it removed. Check the current station instead of reserving resources for it. Event-only recipes such as Flower Pot and seasonal Crock Pots should likewise not be assumed available in every run. Craft limits and class perks can vary; the recipe screen is the final check.
Tool Workshop and Meteor Anvil
The Tool Workshop must be found and its anvil assembled; it is not a higher tier of the camp bench. Some recipes depend on the workshop or biome, and some appear in a random slot. Read the full recipe at the Tool Workshop before gathering materials.
| Workshop recipe | Reported materials or condition |
|---|---|
| Hammer | 5 Wood + 5 Scrap |
| Bandage | 2 Bunny Feet + 2 Wolf Pelts (PC Gamer) |
| Mammoth Helmet | 2 Mammoth Tusks + 2 Wolf Pelts; snow biome workshop |
| Infernal Helmet | 1 Cultist King Antler + 6 Scorpion Shells; volcanic workshop |
| Chainsaw | 4 Cultist Gems + 4 Bear Pelts + 2 Alpha Wolf Pelts + 10 Scrap + 6 Bunny Feet; random slot |
| Riot Shield | 4 Cultist Gems + 4 Bear Pelts + 6 Wolf Pelts + 6 Bunny Feet + 10 Scrap; random slot |
| Tactical Shotgun | Reported: 4 Cultist Gems + 4 Bear Pelts + 2 Alpha Wolf Pelts + 10 Scrap; random slot, cost may be incomplete |
| Thorn Body | Reported: 4 Cultist Gems + 4 Bear Pelts + 2 Alpha Wolf Pelts + 10 Scrap; random slot, cost may be incomplete |
| Boar Helmet | 4 Boar Tusks + 2 Mammoth Tusks; one original community source; availability unverified. Boar Helmet |
The catalogue says a Meteor Shower can change the workshop into a Meteor Anvil. Its reported recipes are listed separately; confirm the event and full recipe in the current run.
| Meteor recipe | Reported materials |
|---|---|
| Axe Trim Kit | 10 Meteor Shards + 3 Gold Shards |
| Armor Trim Kit | 10 Meteor Shards + 5 Gold Shards |
| Obsidiron Boots | 10 Meteor Shards + 1 Obsidiron Ingot |
| Obsidiron Chest Blueprint | 10 Meteor Shards + 5 Gold Shards + 3 Obsidiron Ingots |
Plan bandages for the whole team
PC Gamer’s route requires campfire level 4 and an upgraded axe or chainsaw to clear the Tool Workshop entrance. At its Anvil, select Bandage on the nearby bench and place the required materials on the station one by one. The source reports a cooldown of one craft per day; verify the current screen.
At the separate Tool Workshop, check the Anvil’s Bandage recipe before gathering hides. The table above is a reported recipe, not a fixed budget for multiple crafts: PC Gamer says the resource cost increases after each craft. Inspect the displayed cost again before making another and keep the campfire’s fuel reserve separate.
Both bandages and medkits can revive teammates. For a rescue, clear the immediate threat, approach with a healing item and follow the on-screen prompt. A bandage can be reserved for revival while a medkit is kept for its larger heal; agree who carries each before leaving camp.
A practical spending order
- Secure the fire and a safe return route. If the bench offers the reported price, craft the Map for 3 Wood and work toward Tier 2; do not burn all your wood on the bench while the fire needs fuel.
- Choose a Compass or Sun Dial for navigation and time, then a bed, trap or food setup according to the team's immediate problem. Check current prices, especially Farm Plot and walls.
- At Tier 3, compare food needs with fuel needs before choosing Crock Pot or Biofuel Processor. Radar and Boost Pad can help exploration, but check extra operating or unlock requirements.
- Save rare gems for the upgrade or device that solves your current problem. A Teleporter needs a second endpoint, and late devices can have charging or use requirements. Confirm those details before committing rare materials.
Material costs that differ between sources
Beebom lists 8 Meteor Shards for each Axe Trim Kit and Armor Trim Kit, while the catalogue above reports 10. For the Riot Shield, 99 Nights DB records reports of 10 or 25 Scrap. The other required materials may also differ. Open the recipe at the station to see which cost applies before gathering materials. Beebom · 99 Nights DB
One each of the 29 items plus all four bench upgrades totals 510 Wood, 452 Scrap, 6 Cultist Gems and 5 Gems of the Forest. This excludes fuel, duplicates and workshop recipes; you need not craft everything. Costs can differ or change, so check the current bench. Toybox Values
Sources
Revision history
— Recently updated