
Prioritize survival, focus and spells, compare the three staff stances and learn how to respec Sparks.
Start with Smash Stance. Spend Sparks first on skills that help you dodge and complete light-attack combos consistently, then add one or two improvements to your usual focus abilities or Immobilize. If a fight stops your progress, respec at a Keeper’s Shrine and concentrate points on the survival or damage you need. You do not need to max all three stances at once.
How to earn and respec Sparks
Leveling up and some exploration rewards grant Sparks. At a shrine, use the self-advancement menu to invest in staff stances, foundations and spells. Read the prerequisites: some skills require earlier nodes or a particular level.
To change your build, choose to respec Sparks at a shrine. You can reclaim an individual skill or redistribute everything. Where skills depend on one another, reclaim the dependent later skills first. Respeccing does not cost Will, so you can experiment and adjust again. Follow the button prompts for your PC controls or controller.
Early priorities: stay alive first
- Foundation stamina and dodging: If you often run out of stamina during enemy combos, invest in nodes that improve stamina management. Once you find the skill that lets you continue a light-attack sequence after dodging, work toward it through its prerequisites. Practice watching the enemy after a dodge; the skill does not grant unlimited dodges.
- Focus and Smash Stance: Save a few points for focus and the Smash abilities you use often. First make sure you can reliably land a heavy attack when an enemy finishes a move. The general skill that restores a little health when you spend focus is useful for beginners who often counter with heavy attacks.
- Immobilize: Once you can survive consistently but often miss damage opportunities, invest remaining Sparks in Immobilize. Read the effects and mana cost; you do not have to cast it in every encounter.
This is a priority order, not a fixed allocation. If you keep falling before you can drink from the gourd, reclaim damage points for survival. If you dodge successfully but fights take too long, move excess defensive points to attacks you use. Test the changes a few times on nearby enemies or a boss before keeping them.
When to switch between the three stances
| Stance | Unlock and characteristic | When to try it |
|---|---|---|
| Smash Stance | Available from the start; charge a heavy attack while moving | Most first encounters: adjust distance while moving and strike after the enemy finishes |
| Pillar Stance | Can be unlocked with Sparks from level 5 | To avoid some ground pressure; check the enemy’s attack height and your stamina |
| Thrust Stance | Can be unlocked with Sparks from level 20 | To counter from farther away or use a straight thrust |
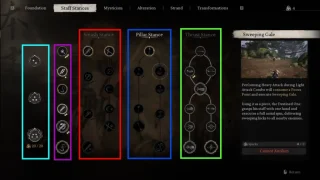
In the image, Smash Stance is boxed in red, Pillar Stance in blue and Thrust Stance in green. Each node still has level and prerequisite requirements. Image source: Maxroll beginner’s guide.
Pillar Stance is not immunity to every attack: high and area attacks still require dodging. Thrust has longer reach, but an enemy moving sideways can make it miss. Practice switching and heavy-attack range on safe enemies before taking the stances to a boss.
Two builds to try
Frequently defeated by combos: Reclaim unfamiliar Pillar or Thrust upgrades and prioritize stamina, dodging and a few Smash skills. Save Immobilize for breathing room.
Able to dodge but struggling for damage: Keep basic stamina skills and concentrate the remaining points on focus and one familiar stance. Practice heavy attacks after the enemy finishes a move. Either build can be changed at a shrine; unlocking a skill does not mean you have mastered its timing.
Sources
Revision history
— Recently updated